Friday, April 22, 2016

"Circles in Space and Time"

In March this very unusual quilt top came to me at a request for custom quilting.  I was told it would be an entry at the Clark County Quilt Show the following month.  
I love challenges like this!
From the onset I loved the colors. They are dusty and earthy.  My client's choice to use circles - in keeping with the show theme, Circle of Life - speaks of the constant change in seasons, the weather and the elements of nature.  She designed blocks around a panel, with the panel being off-set to one side, which to me, translates the random, asymmetrical quality of nature. Though a one-dimensional form, movement is suggested in the fabrics themselves and through pattern design. When quilted, art form takes a two - and if you're successful - a three-dimensional quality. At our first consult I asked myself: how could I contribute to the energy already there?  

My client's perspective (in bolded italics throughout this post): "Circles in Space and Time" was inspired by the colors and shapes in this purchased printed panel and a class that I took in Sisters, Oregon called "Circle Dance". Although the idea of using a panel was my idea, using two sizes of Drunkard's Path blocks in nontraditional ways was the purpose and intent of the class.  Originally, I envisioned quilting this in six smaller sections on my home sewing machine before assembling it. But after patiently waiting for a couple years for me to finish, I relented and decided to sew it all together and have it professionally quilted by a longarm quilter whom I met last year in September at the Portland Expo Center Quilt Show.

After 'marinating' quilting design for some time, I decided to convey a nature cycle with sunny skies feeding blowing grasses. A watery koi pond evaporating to the skies, which in turn rained down to earth. The sun comes out and starts the process all over again. Follow with me as I show you what I've tried to bring to life with the needle. 

"Sunny Skies" begin at the upper right of the quilt. All quilting is mixed technique, some freehand and some digitized to get the best effect.


Next is the quilt back showing the 'wind' and things tossed about by it on the ground or in the air.  Also depicted are those things fed by the sun.  
The "Blowing Grasses":
Over a year ago, I doodled some ideas on paper for quilting a variety of designs that I thought I could do free motion before purchasing a mid-arm sit-down quilting machine. But the deadline for this year's quilt registrations came quickly and I was running out of time to do everything I wanted to do all by myself. Connie was the only longarm quilter I could find in Vancouver who was willing to do custom quilting. This is the third quilt she has done for me and her quilting ability is far better than mine. Her ideas for quilting motifs surpassed my expectations and brought extra life and imagination to my treasured patchwork project.
The quilt back, showing quilting detail on the "Blowing Grasses" section:
The "Koi Pond":
What, other than koi, would you find swimming or wriggling in a koi pond? What would you find growing in or near one?


To me the two dimensional circles represent the building blocks of life: atoms, molecules, blood cells, suns, moons, planets, etc. and even air bubbles in water.  Some of the stylized circles represent lily pads (plant life) and mimic those found in the panel.


The "Chance of Rain"section:


The pumpkin seed pattern gave a sense of raindrops to me.  I tried to quilt on each circle whatever would be found floating/flying in the sky; clouds, butterflies, swirling plant life, etc.


Connie found a variety of digital sashiko patterns to use representing flora and fauna. These are featured on the circle surfaces. Although we collaborated on the selection of quilting thread colors and background quilting designs, it took Connie's passion and vision to make my basic ideas become a reality.
"Hidden Critters"
The quilt back
I took this snapshot at the show before the final ribbon was given to my client in its category: Viewer's Choice. (The purple ribbon shown is a vendor award). As I've said before, it's not all about awards and ribbons. But when you get one, it's thrilling someone else could see what you tried so hard to convey.


It's just another one of those reasons why I quilt.

Monday, April 11, 2016

"In Celebration of Daughters - The Circle of Love and Life"


I belong to the CCQ - the Clark County Quilt Guild.  Last week was the 41st Anniversary of their annual quilt show, "Circle of Life".  There were 282 quilts in the show.  Five I quilted professionally for clients, and one I designed, pieced and quilted.
 A client quilt entry is being shown in this post, with the others to come in future posts.  
She used the most darling fabrics for all the stages of family life.  

In my client's words: 


Using the double wedding ring pattern symbolized the circle of life with all the interwoven love and support the generations of our family past (grey rings) and present (red rings) give today's family. They have passed on their love, values, beliefs, traditions and love. 
The outer fussy cut appliqued rings represent today's women. 
The rings (beginning at the top and moving clockwise) represent the cycle of a daughters life: romance, love, engagement, marriage, honeymoon, homemaking, having children, and raising the next generation of daughters through preschool, teens, college, work and their own romance, marriage...and the circle of love, circle of life continues.


I was inspired by the old gospel lyrics "will the circle be unbroken" and by the six generations of oldest daughters in my family.

Will the circle be unbroken
Bye and bye Lord, bye and bye
There's a better home awaiting
In the sky Lord, in the sky

(The Survivors, 1982)


Monday, April 4, 2016

What can be done with just four quilt blocks?

Good question. Here's one answer.

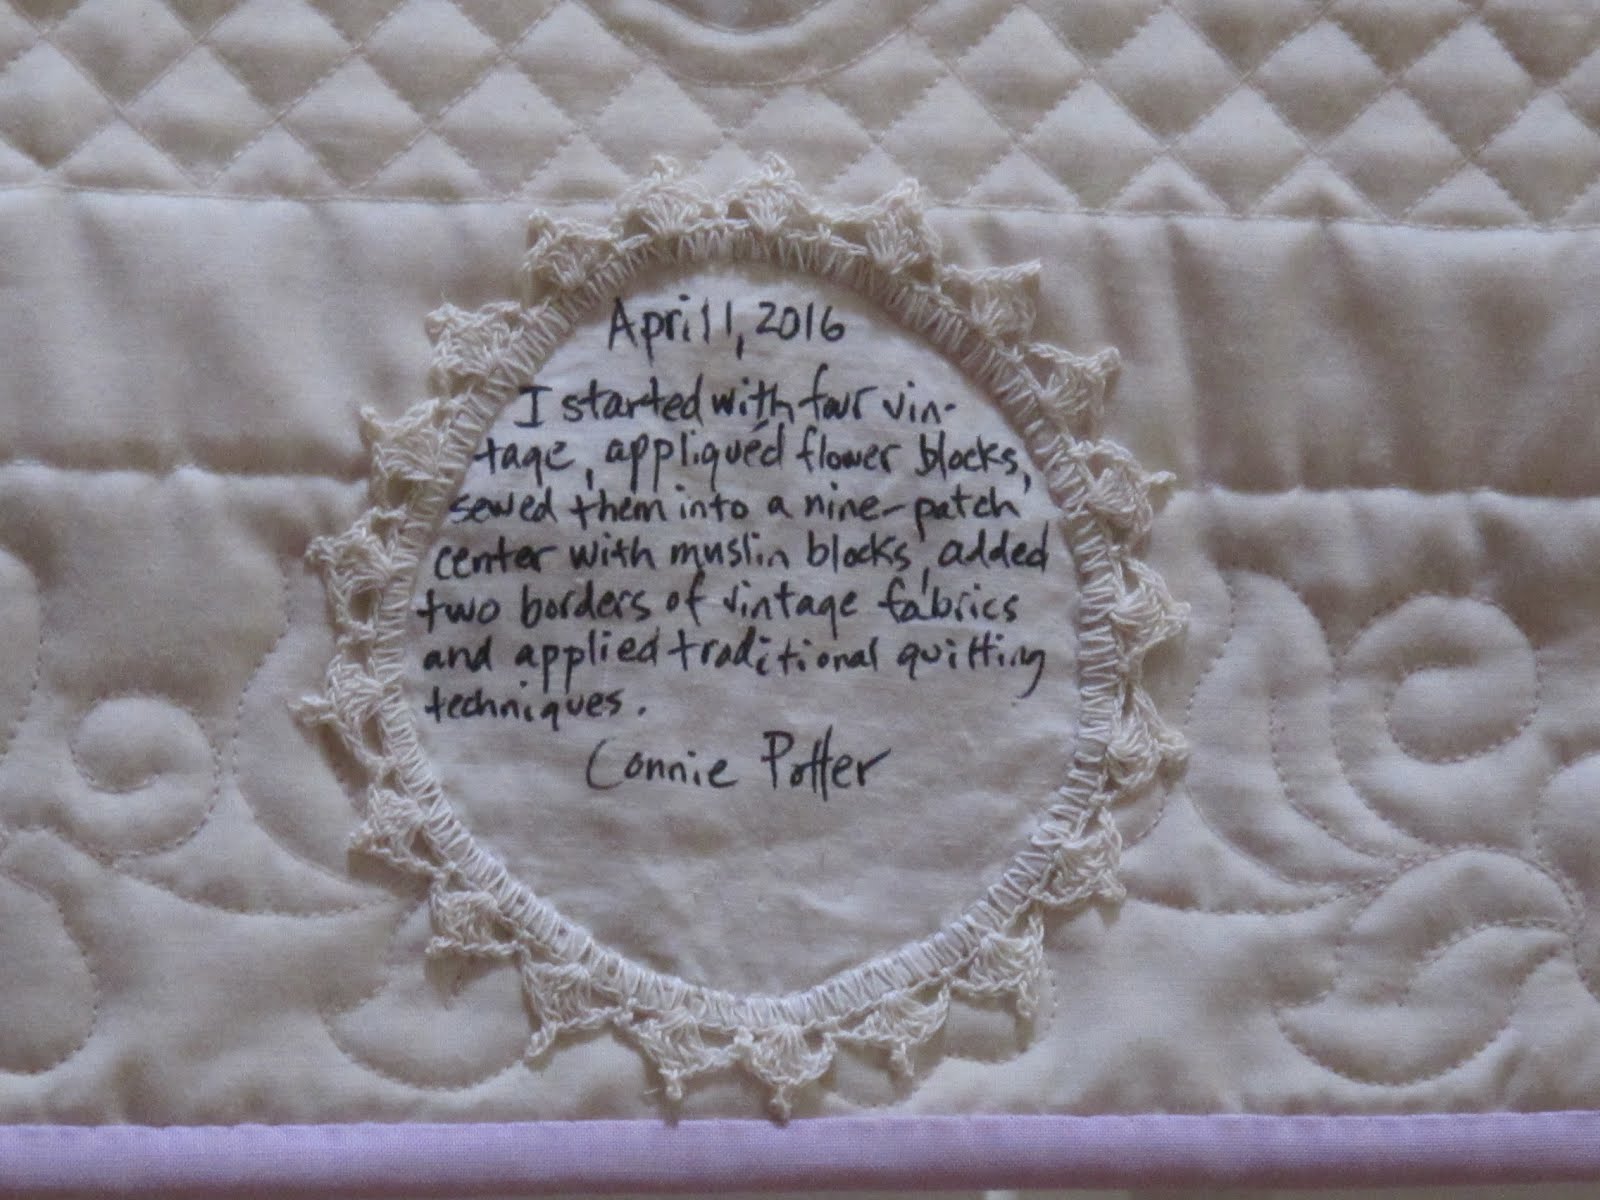
Before I talk design, I wonder why these four, 9" vintage floral blocks sat for as many decades as they did before they became a quilt. What were they intended to be? Were they just for practice or leftovers from a larger project? Would the original creator be happy with my design? Ah, well. I hope so. Above all, I made them up into this little sampler specifically to further my computer quilting knowledge, certainly not to win an award for innovative piecing. 

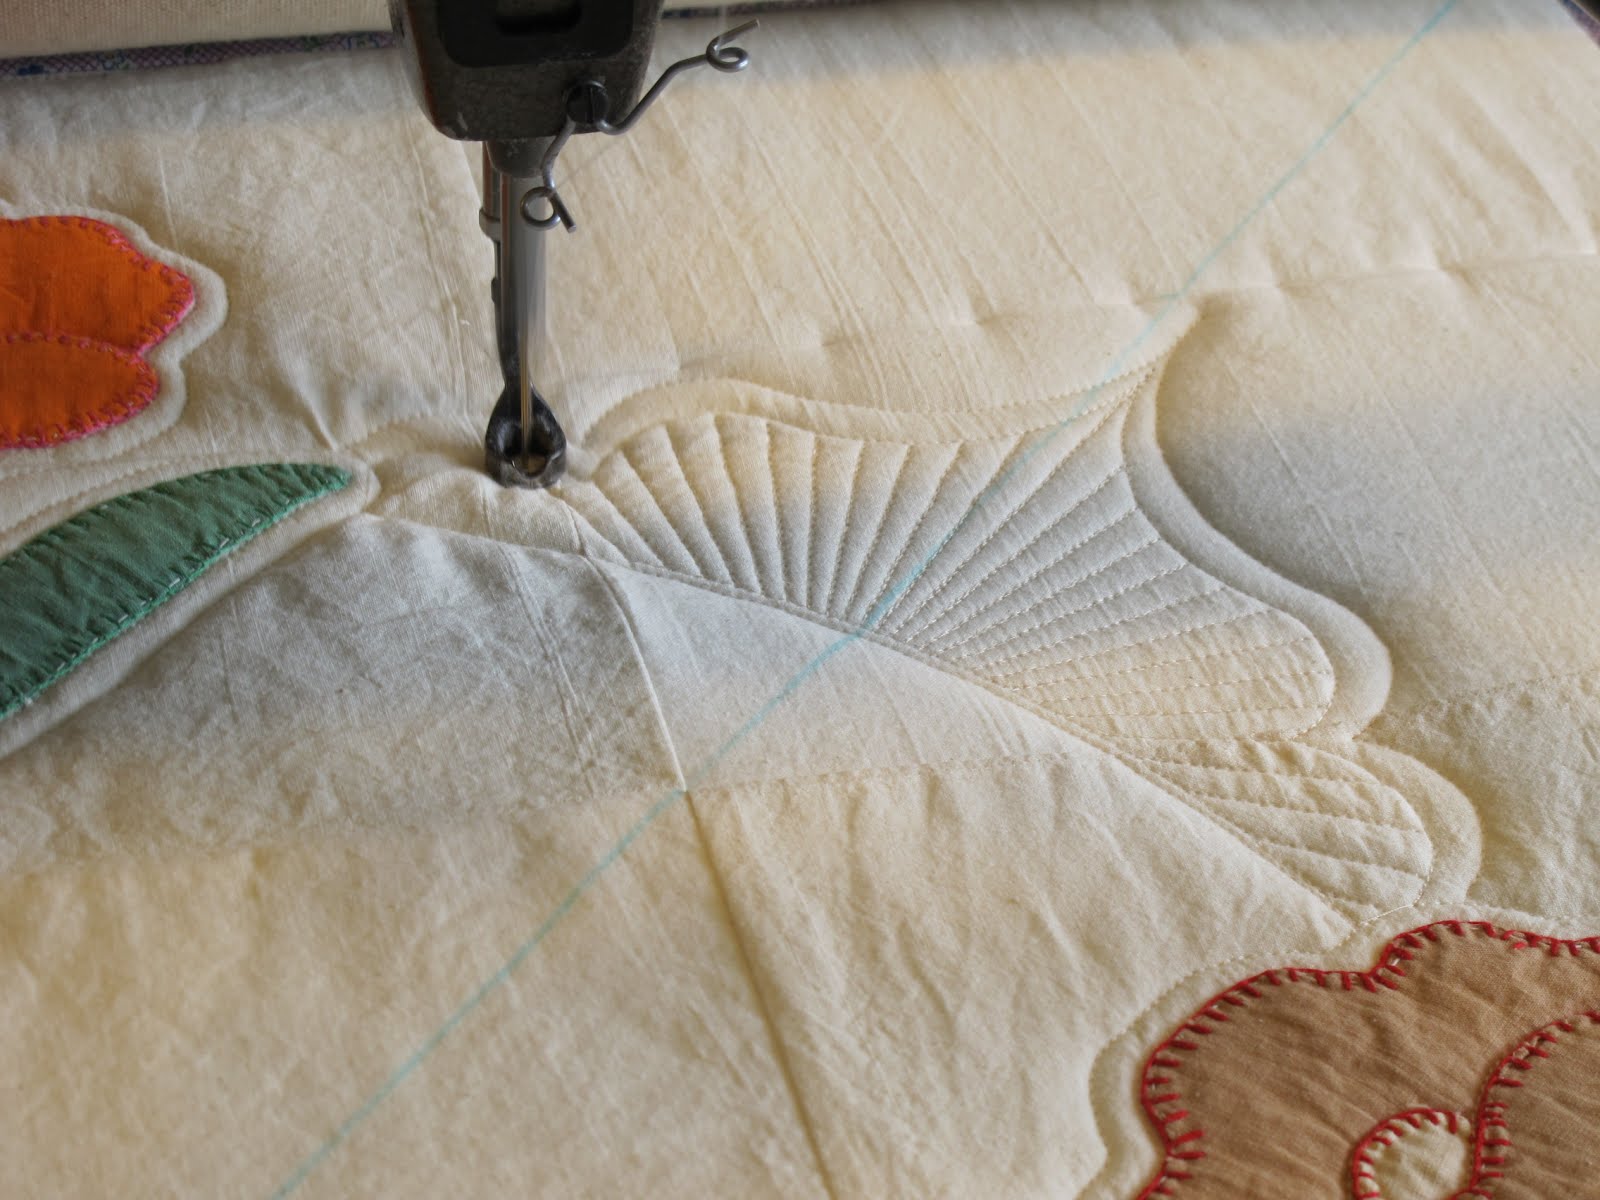
I have to apologize that I forgot to take pictures of the individual blocks before piecing the top. Sometimes my brain advances into quilting design and I forget to snap photos of the complete process. You can see from the picture above - where I'm already quilting! - that the appliquéd blocks have been arranged into a simple nine-patch configuration with 5, 9" muslin blocks and framed with a dual border of vintage fabrics. What quilting techniques speak to me from this quilt is a medallion in the center instead of quilting each of the nine blocks separately. It's almost like quilting a whole cloth, though this wasn't my intention. I wanted an illusion of the flowers 'linked' in a circle somehow, and a medallion seemed right. 

I begin by marking the center of my quilt with a blue water-soluble pen (as I've shown in past posts and can be seen in the pictures).  I use this center marking on the quilt top to position my medallion pattern chosen, below.


With my computer tools, I've trimmed inside anything I don't want to quilt over or into. The picture of my computer screen shows how I've outlined each floral appliqué. When I quilt, my machine will only sew the medallion where I tell it to, as is seen in my next two photos.
What comes next is selecting and quilting the medallion center motif.  My computer screen shows the pattern chosen and placed in the center of the screen and how it would quilt...
...as demonstrated below on the actual quilt...
...and as completed.
With the center still needing something ... I don't know what yet ... I ponder for a while as I switch gears to consider the background behind the medallion. Certainly, the background needs quilting. So, I decide upon crosshatching. And THIS is a traditional technique I've only done freehand, never digitized. So far this project has rung true to trying new digitized techniques, where I've already incorporated appliquéd motifs within the quilting (such as I did today with the flowers) and now a digitized background fill. I choose a crosshatching pattern, drop it into my project on my screen, trim inside the medallion, and quilt:
I stand back from my quilt as quilted so far, and readdress the medallion center. Something is still missing. There isn't enough definition. Do you see it? It's flat and lacks depth.
Here I've begun to work so quickly I've forgotten to take pictures of every step of my progress, again.  If you'll look at the previous picture compared to the one below, I've already quilted two circles outside the quilted flowers next to the pearls. And now, I'm micro-stippling the spaces outside each quilted flower, freehand...
...and the finished effect. 
Now to spritz the blue marks out.  I don't want to dunk this one in water to remove them (as I've mentioned in earlier posts) because pink and red vintage fabrics have a knack of bleeding. The quilt is a bit damp but a photo is necessary here before the final ones:
The 'dry' quilt:

What can be done with just four quilt blocks? I hope I've answered that question with this single technique. There are many others, like runners, napkins and shoulder bags.  To me, these blocks evolved the way they needed to. The main reason is that two of the blocks were set on point, while the other two were not. 


As I've always said, fabric speaks to me. It's something I try to follow. And maybe, just this once, I also received a nod from the departed soul who appliquéd them so many decades ago. 

This is another reason why I quilt.


Thursday, March 17, 2016

March 17th Lucky Quilting Discount


Contact me* for an appointment for one edge-to-edge project
March 17th through the 19th
and you'll receive 17% off quilting charges!
Your appointment does not need to be made on those days, but you must contact me during those days to set the appointment for no later than April 29, 2016.

*click on my "Contact Me" tab

See you soon!

Friday, January 29, 2016

Vintage T-Towel Remake

My mother is a domestic in every sense of the word.  She personifies the dainty figures in t-towels who are washing, mending, ironing, etc. on certain days of the week, and when the week is over, the same happy routine starts all over again.  Mundane? Not for my mom.  And like my mom, I've learned to love taking care of my home, as well.
As a homemaker, she has embroidered t-towels for her family for decades. She has gotten to the age (88 yrs.) that I hoard them if I receive them as a gift from her instead of using them as they were intended.  She found out once and said, "Bah!  You need to use them".  A few years ago I asked her to make me two identical sets and shelved them until I had gathered enough vintage 30's fabrics. The following Mother's Day, I picked her up for a day of antiquing - our favorite pastime - followed by a nice lunch.  While waiting for lunch and enjoying the beautiful summer day, I pulled out two nicely-wrapped small boxes from a bag I'd been carrying, one for me and one for her.  She snickered at the idea I wrapped a gift for myself.  But when she opened hers and I opened mine, she knew why and started to cry. We had matching t-towel quilts. She showed everyone in the restaurant :). That's another reason why I quilt: to permanently save a bit of someone you love right into the very fibers.

What follows in this post is the process I used to make the t-towel quilts, and not the very ones I quilted for my mom and myself.  Here, I used seven t-towels with appliquéd and embroidered figures busily engaged in household chores every day of the week - except Sunday, of course :).  Now, my mother never appliquéd t-towels, yet her embroidered ones were just as darling as these.

I've cut each towel into 8 1/2" blocks - the maximum size considering the motifs are placed at the bottom edge of the towel.  At the upper left of this photo sits the discarded t-towel fabric...
...wait.  Discarded fabric?  No such thing.  I've decided to use most of it for the borders (see below where I'm cutting the t-towel fabric into border strips).  The white fabric in the pinwheel is 'discarded' t-towel fabric, as well.  You know the saying: "Use it up, wear it out, make it do or do without".  The thrift of the 30s seeps right into what I'm quilting.
I designed the pattern to accommodate an odd number of blocks - seven - and here is the center of this quilt, ready for the borders.  (I've pinned it to a 30s quilt hanging on the wall - a bit bright and confusing at first until you find the blue sashing around each block).
 I finally finish the quilt top, load it, and start quilting!  You can see the borders around my nine blocks, with four pinwheels in each corner.  I've completed most of the t-towel blocks with appliqué stitching and scallops, and continuous curve in the pinwheel blocks to emulate 1/4" stitching, like the women did in this era.  In the borders I've marked my spines for feathers with a water-soluble pen.
 Continuous curve shown close up.
The photo below shows the feathering progression from spine to feather fill.
The blue markings will disappear after I dunk the borders only in cold water.  I don't want to get the center of this quilt wet because I'm not sure if the red fabrics and embroidery thread used in the appliquéd areas will bleed.
 When carefully placed, the scalloping can almost seem to float behind the blocks like clouds in a straight line.  This is intended because it gives a balanced look to the quilt.
The finished product, complete with binding, hanging sleeve and a vintage doily as a quilt label.  The blue feather spine markings have disappeared.
I'm entering this little quilt in a local show next month, with the theme "Circle of Life".  Certainly, the chores we women do all our lives have one continuous round - day after day and week after week.  Mundane?  I suppose so.  But for me, I know I'll think of my mother fondly each time the dust flies or the cobwebs disappear.  

And I won't mind.