Friday, December 23, 2016

From my Studio to Yours...Merry Christmas!


Thank you for a year that surpassed my imaginations.
It's been a lot of work to continue my quilting business in a new locale.
But you've all been so supportive:
quilt shops, guilds, both new clients as well as returning ones.
I look forward to seeing your new quilting creations in the New Year,
and helping you complete them.  I value your trust.

May God bless!

Tuesday, October 25, 2016

The Second (and Final) Raffle Drawing for Free Longarm Quilting

Same rules apply (see previous post) 
except only the winning number (1896145) and following dates have changed:
I’m giving the winner (whose identity I know) until 10:00 a.m. PST on 10/31/16 (Halloween) 
to contact me via email or phone (see my "Contact Me" tab) 
when this raffle will be called to an end.  
Hopefully, it will produce a real winner this time!!

Thursday, October 20, 2016

And the winner of the *Free Longarming Raffle is ...

*Free quilting services only. Raffle offer excludes products (batting and thread), binding service, shipping and WA state tax. 

(Entrants were told to watch their email for a subscription verification email within one week of drawing their ticket on 10/8/16 and given instructions on how to verify it. Only those who verified their subscription would receive this blog post via their email.  Raffle drawing winner has been drawn at 3:30 p.m. 10/20/16 and should be posted on my blog within 48 hours of that time/date).

Important:  The lucky person now needs to come forward!   If you drew Ticket #1896153 as pictured please contact me (click on "Contact Me" tab on my blog site at ppatchworks.blogspot.com.  I do have your name but for privacy reasons am not posting it here.  If I am not contacted by 10:00 a.m. on 10/25/16 I will redraw another number and repost.

Thank you everyone who participated!

Thursday, October 6, 2016

Raffle for free professional quilting!

Sneak peek of a booth item
Clark County Quilters Stash Bazaar
Saturday, October 8th; 9-2pm
Salmon Creek Methodist Church
12217 NE HWY 99, Vancouver, WA
This is a reminder to get your free fat quarter at my booth (in the gym - look for my business sign) when you mention this post/email. I'll have quilt kits, vintage quilt blocks, So Fine quilting thread, rulers, stencils, seasonal items, wideback yard goods, fat quarters and yardage, quilt patterns, and more priced to go. Free admission and parking. Fat quarter available only to those present at the show.

Also, I'm holding a raffle for free longarm quilting, one quilt top any size, edge-to-edge only, quilting services only (offer excludes products, binding services, shipping and WA state tax). 

How do you register? Come to the show Saturday and fill out a raffle ticket with your email. I will subscribe you as a blog follower with the email you indicate. 

How do you know if you've won? Everyone will be notified by email as long as you activate your subscription when you receive the subscription confirmation email a few days after the bazaar. (If you don't receive the confirmation email during this timeframe please contact me BEFORE drawing day). The winning number will be drawn 10/20/16 and posted on my blog within 48 hours (I can't control Google), so keep your number handy! Your name will not be posted.

Don't live in Washington? You don't need to be present to register or win.  If you live at a distance and want to enter send me an email at ppatchworks@gmail.com and I'll draw you a ticket and send you the number.  

Good luck!

Monday, October 3, 2016

Sue Spargo's "Folk-tails"!


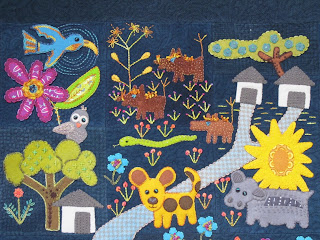
Earlier this year I worked on a  woolen quilt for a client, the pattern taken from Sue Spargo's Folk-tails, which was published this summer. 

All 119 pages not only give the patterns for what you're about to see - they also delve into Sue's love of Africa, and are complete with African folk-tale short stories. 

I hope you enjoy the 'before and after' pictures of this incredibly appliquéd, layered and embroidered woolen quilt.


The "before" pictures:   Try to soak in all the beautifully handcrafted work!

I cannot imagine the hours and hours and hours it took to create this piece. Click on each photo to zoom in on the embroidery, the vivid colors chosen, and the lively theme.
I have to admit that from a longarmers' perspective, the quilting design of a 100% woolen quilt can be overwhelming. However, if two ground rules are followed, design is simplified and appropriate.
1) Try to avoid quilting through embroidery whenever possible (on woolens and any quilt having embroidery)...
2) On woolen appliquéd pieces, try to minimize quilting onto layers. The quilting focus is to use background stitching as a complement to the quilt, and to stitch around what has been appliquéd. Larger areas will certainly need stabilizing/defining, but as a general rule, stay off heavily hand-stitched appliqués, such as have been used in this quilt. 
You can see the quilting challenge! It is a thrill to consider designs...
Did I succeed with my ground rules?  The 'after' pictures follow with commentary by the author, Sue Spargo, on what inspired her to create this wild, woolly quilt.

  Africa is deeply embedded in my soul. 
 Childhood memories continually fill my mind…
...the beauty of the land that is rich with wildlife and wild land.
I can feel the hot African sun and dry breeze on my skin, the warm, rough sand beneath my bare feet...

...the smell of the bush veld — dusty and dry and filled with the scent of the animals that live there. 

I can see the sky so clear and so blue. 


Nightfall brings a massive river of shimmering stars that span the sky. 


Masses of tall grasses camouflage the seemingly endless numbers of animals that live there. 


The land is spotted with dense clusters of trees; the bare branches of the Baobab look like roots extending to the sky. 


I hear the songs of a thousand birds during the day...


...and the silence of a pitch black night is at times broken by the roar of a lion which shakes my body and cuts straight through my soul.   


To start on your Folk-tails project, go to http://www.suespargo.com/store-detail.php?cat=12.  You can also order the kit.


What an intense pleasure it was to quilt!


Thursday, September 15, 2016

There's Something Fishy Going On...


No, it's just an old Building Block Series, Out & About from Pine Needle Designs by McKenna RyanI'll have to admit though; with my Ottlite providing plenty of light on a dark, rainy day earlier this year, it does look like an interrogation was conducted or watched through a key hole.  I assure you, no fish were hurt in the writing of this post and no secrets of the oceanic deep were revealed!

Anyone who has worked on a Pine Needle design knows it requires attention to detail and patience in the raw-edge appliqué process. I've chosen 'fishy' batiks from my stash, traced the designs, fused my fabrics, cut the appliqué pieces out, and am arranging them here using an appliqué pressing sheet on top of a placement guide for each block. Once arranged, the pieces will be semi-fused into place, then transferred to my background fabric and permanently fused. After that, I'll freestyle quilt the three separate blocks, loaded all together onto my leaders at the same time. Fast-forwarding to completion, the next picture shows how I mounted each block onto canvas to be displayed as wall art.


The first block, called Heads or Tales?, is my favorite because I think the colors are most accurate. To me, it seems my fish evolve in weird color combinations as they swim! Even the rocks are psychedelic. Thanks to Prince, there's Purple Rain. But purple rocks? Well, anyone who's snorkeled knows light dances in the water, making everything look 'otherworld'. So, it works!


Rock Bottom is the second block in the series with lots of color going on. Who's afraid of color?! Not me by now.


The fish get a good dose of realism if you'll look 'into their eyes'. I bought some sticky eyes off the internet and affixed them onto each fish after I put the blocks onto canvas. 


The last block is called Bali Dancing. Years ago when this series first came out, McKenna Ryan had these patterns packaged as kits with her special lines of fishy fabric. The background was a solid piece but had many hues. But not for my project. I used my own batiks on hand, and then had to purchase three shades of blue to translate depth; a light one at the surface, a medium tone for halfway down, and a deep blue at the river bottom for an illusion of depth.  
All the quilting was hand-guided, from the curls in the water to the appliqué stitching around each piece.


What a joy this was to construct and quilt this spring and summer! I gifted it to my husband who is a catch-and-release fly fisherman. While I don't think he'll catch fish quite this color, I know just looking at the likeness of fish makes him itch to get out on the river. Nothing fishy about that!


Thursday, August 18, 2016

Vintage Series XI - A 'Utilitarian' Grandmother's Flower Garden Beauty


Thanks for meeting me at the Howard House again today for the eleventh post in my Vintage Series, the 'Utilitarian' Grandmother's Flower Garden quilt.

(Pictured at left is a block of the vintage quilt from my last post in this Series...)


Its utilitarian, or hardy, every-day quality is what sets this quilt apart from the GFG quilts we're used to seeing. The hexagons are much larger, making it much simpler if not quicker to piece and finish. Compare it with the smaller hexagons in the GFG in Vintage Series III, found in my Blog Archives, dated October 7, 2013.  


We have many lessons to learn from quilters of the past, who used what they had to make something useful. But I hope you agree that being a practical, utility quilt can have beautiful results, as well, which this charmer has in abundance.


The top was an antiquing find a few years ago. It waited just for this moment in time to be quilted in an all-over feather design and bound in Kona Cotton Aloe fabric. I attached a vintage doily as label and immediately shipped it to a dear friend just in time for her wedding this summer. She said she'd treat it with utmost care, which is good, of course. But I hope she USES it, because that's what quilts are for, especially these 'utilitarian' quilts. They were intended to be used. And certainly the very definition of utility means useful.

If there is anything I can offer to you to think about today, it would be to USE your quilts no matter their age. Sleep and nap under them, drape red and green ones on a couch at Christmas, use them as tablecloths, display them on your walls and change them up in-between all these duties. At the very least, if you have them folded away, take them out to appreciate them and REFOLD them along different folds from time to time.


I hope my posts have been useful to you throughout the years! If you have any ideas for future, useful posts, comment below or email me (see my Contacts Tab). I welcome your input!


Friday, June 24, 2016

Vintage Series X: The Embroidered-Block Quilt

Welcome back to the Vintage Series!

Though I've had a few vintage quilts to talk about since my last Vintage Series post on June 6, 2014, I'm returning to the 'official Vintage Series format' which I hope you continue to enjoy.
O. O. Howard house today
My backdrop today will be the General O. O. Howard House. The Howard House was the last historic structure to be rehabilitated on Officers Row, an area that served as residential housing for many of the soldiers, officers and families stationed at Vancouver Barrack. The original Officers Row is pictured, below. 

Anchoring the stately, tree-lined boulevard's western end, the home is named for its first inhabitant, Gen. Oliver Otis Howard (1830 - 1909).


Officers Row
Recipient of the Congressional Medal of Honor in the Civil War, Howard was the first head of the Freedman's Bureau, established in 1865 to aid former slaves. From 1874 - 1880, Gen. Howard was Commander of the U. S. Army's Department of the Columbia in Vancouver.  

O. O. Howard House in the late 1800s
The house that bears his name was built in 1879 and is an excellent example of late - 19th century Italianate - style architecture. The first to occupy its grand halls and rooms was Gen. Howard and his family.  

It's a perfect home caught in time to stage these quilts that are also remnants of an era long gone. It only seems appropriate to get into a bit of quilting history around the era of this pink, blue and white beauty. But first, let's talk quilting procedure.

 I found this late 1920s embroidered quilt top antiquing in Pueblo, Colorado eight years ago and paid a good price for it, even though there were (and still are) a few holes I tried desperately to repair. Why did I wait eight years to quilt it? Simply because I didn't have the foggiest idea how to make the uncentered embroidered motifs look perfectly centered. I didn't have the skills I wanted for this effect...yet.

Problem: As is true with any quilt top, the rows, blocks and sashing on this quilt are not perfectly square.
Solution: do you see the three bar magnets I have positioned to my belly bar?  They are helping to hold the quilt top square as I baste the quilt top together. After basting each row I remove them, advance the quilt, check for squareness, and use them if necessary. By the time I'm finished with basting, this uneven quilt top will be convinced to be very square. This is vitally important if the quilt is to be hung on a wall for display, or even when it is positioned on a bed: it will drape evenly. This is especially important when a quilt is to be entered for show.
Even now while basting I don't have a clear plan on what techniques I'll be using to quilt it. But it's sat in my closet long enough and deserves to be finished. I have some good ideas though, which I marinate for a few nights after basting the quilt to the frame. 


Here I've sped forward with my plan, forgetting (again) to take photos. To the right is a good preview of the freehand techniques used: SID inside each block and appliqué stitching around every embroidered motif to anchor the quilt.
Then I engaged the computer belts and marinated digitized application. Initially, I wanted to place a feathered wreath at the center of each block, but knew since the embroidery wasn't centered, it would make the quilt look imbalanced. 

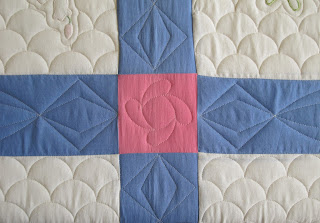
I ponder ideas a bit more and - tah dah! - I came up with a background fill, which would make each motif look like they're floating. I chose this clamshell design to suit the era in which the quilt top was pieced. 

It works.

The sashing and cornerstones get some royal digitized treatment, too.
Other blocks...

See how crooked this motif was placed in the block? Not a problem with the fill.

Another uncentered motif, but the clamshells give a balance that otherwise isn't there.

And now, the finished quilt (finally!) and some history behind the makings of it, originally.

The middle of the 1920s marked an abrupt change in the color of fabrics being produced. 

Women may have wanted quilts that reminded them of their heritage, but they wanted them in the new pastel and light-bright color schemes. Designers promoted their dreamy floral appliqué designs, and quilting came to be seen as an art rather than a utilitarian craft. 


Although a great many pieced quilts were made, appliquéd quilts were particularly prized. Interest in embroidery - such as the one I'm featuring - was also renewed and women sometimes incorporated it into their quilts. 


Pre-stamped quilt blocks were sold with embroidery motifs. All this was well underway before the crash of 1929. The stage was set for a renewed love of quilting among American women...that continues today.


I hope you've enjoyed a step back in time
through this Vintage Series post.  Come back soon for another trip to the Howard House.