So, you went antiquing and found a vintage quilt top that's been through hard times.
You love it, but is it worth the purchase to finish?
Or maybe you inherited a damaged heirloom top.
Either way, today we're talking about some ways to repair them before quilting.
You love it, but is it worth the purchase to finish?
Or maybe you inherited a damaged heirloom top.
Either way, today we're talking about some ways to repair them before quilting.
Disclaimer!!! Don't get me wrong - I'm no authority on how much to pay for vintage quilt tops, or that I have all the 'right' repair techniques. I just have some experience and a bit of know-how on fabrics and fixability that might help a few of you out with your treasures.
So, today we're looking at a very damaged 1930s Butterfly quilt top. When I purchased it, it had multiple stains and holes, and the outside border was so frayed I knew I'd have to trim it before quilting. To add insult to injury, those who previously owned it made some repairs that worsened its condition, like vigorously rubbing with - horrors! - 100% bleach (see below).
So, today we're looking at a very damaged 1930s Butterfly quilt top. When I purchased it, it had multiple stains and holes, and the outside border was so frayed I knew I'd have to trim it before quilting. To add insult to injury, those who previously owned it made some repairs that worsened its condition, like vigorously rubbing with - horrors! - 100% bleach (see below).
The sashings and borders were entirely made of stretchy feedback material. I knew beforehand that this was not the best fabric to hold its shape and be square, so I had someone hold it up for me to check squareness. It passed the test!


In these last two before-and-after ironing photos, you can see how awful the outer edge has frayed. I trimmed conservatively and it worked out swell.
Whew!
I mentioned this quilt top had several holes. Before purchasing the top, I considered how I was going to repair them. Were the holes in difficult places, or could I conceivably repair them? Here's one example of the ones in this top I felt confident about.
The condition of the back of the quilt top is just as important as the front.
You can see in this next picture how sick it was...
...and the means I had to undergo to make it well again:
Why remove these frayed seam threads? Well, so you can't see them from the top. Some show as 'varicose veins', or dark threads through light fabrics. Besides, it just gives a cleaner result.

There were other minor repairs, like the embroidery work on a butterfly's feeler - or entire lack of one. I keep embroidery floss around just for mending vintage quilt tops.
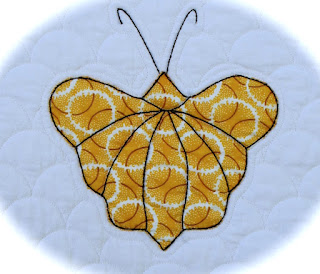
The repairs are completed and I'm ready (finally!) to load the 'old lady' up. I call my vintage quilts old ladies. My daughter thinks it's funny, but it's accurate, at best. I begin by stabilizing and then heirloom quilting throughout in a style reminescent of '30s quilting by SID around the blocks and shadow and appliqué stitching around and in the butterflies.
When this is done throughout the quilt, then I fill each block with scallops (aka clamshells) behind the butterflies to make them appear to be fluttering through the clouds. Another reason for this scalloping background (I've used it before in an earlier blog) is to take the eye away from uncentered butterfly motifs. What butterfly you know stays still long enough to be centered? That's what I say - they just flitter around randomly in nature, and that's what they do in this quilt.
 |
| Here's the right formula, quilting-style: random butterfly placement + forgiving background filler = balanced look. Also, note the replaced muslin piece in this block. It works. |
The last quilting to be done is borders and sashings - and then my 'old lady' is unloaded and prepped for binding in a snappy shade of near-vintage jadeite green; the Aloe in contemporary Kona Cotton.
"The reveal"
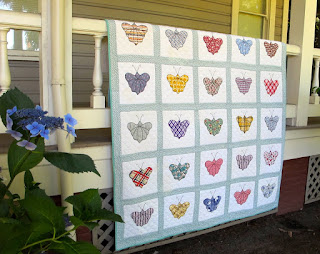
Were butterflies really flitting about these gorgeous hydrangeas? Naw, they're ready for their reveal...
...in period style, of course.
Now this quilt has some show quality, and ranks up with the best of the vintage quilts out there, excepting the fact it was not hand-quilted in its own era.
But it's useable, beautiful and stage-center where it finally belongs.
I hope I've helped you bring your vintage quilt tops out for finishing and revealing!
Call me if I can quilt one or two for you!


No comments:
Post a Comment